Exploring the New Firebase Cloud Messaging API (V1): Sending Notifications from Client Side
- admin
- December 10, 2024
- 0
As the Firebase Cloud Messaging API (Legacy) gets deprecated, it’s crucial for developers to migrate to FCM V1 for enhanced features and continued support. This comprehensive FCM V1 tutorial will walk you through the process of sending push notifications from the client side using Flutter and a service account key. With Firebase push notifications and the latest API features, this migration ensures your app remains secure and functional.

How to Send Push Notifications from Client Side with Firebase Cloud Messaging API V1
Steps to Send Notifications Using FCM V1
Step 1: Set Up Firebase in Your Flutter Project
- Create a Firebase Project:
# Go to the Firebase Console.
# Click on “Add project” and follow the setup instructions. - Add Firebase to Your Flutter App:
- In the Firebase console, select your project and click on “Add app”.
- Choose the Android or iOS icon and follow the setup instructions to download the
google-services.json(for Android) orGoogleService-Info.plist(for iOS).
3. Add Firebase SDK:
- In your
pubspec.yaml, add the necessary Firebase dependencies:
dependencies:
  firebase_core: latest_version
  firebase_messaging: latest_version
  http: latest_version
  googleapis_auth: latest_version
Step 2: Download the Service Account Key
- Generate Service Account Key:
- Go to your Firebase project in the Firebase Console.
- Click on the gear icon next to “Project Overview” and select “Project settings”.
- Navigate to the “Service accounts” tab.
- Click on “Generate new private key” and download the JSON file.
2. Add Service Account Key to Your Project:
- Place the downloaded JSON file in the
assetsfolder of your Flutter project. - Ensure the
assetsfolder is declared in yourpubspec.yaml:
flutter:
  assets:
    - assets/your-service-account.json
Step 3: Send Notification Using Firebase Cloud Messaging API (V1)
- Create Send Notification Function:
# Use the following function to send a notification using the service account key:
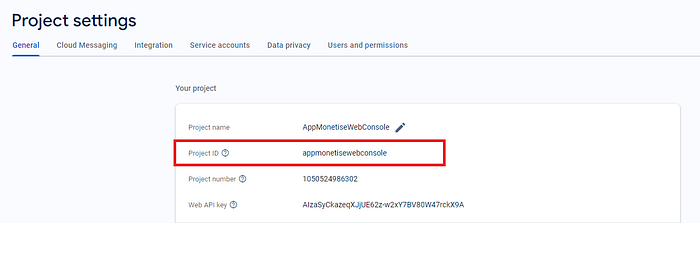
## For <your_project_id> you need to find from firebase console,

import 'dart:convert';
import 'package:http/http.dart' as http;
import 'package:googleapis_auth/auth_io.dart';

static Future<void> sendTopicNotificationv2() async {
  // Load the service account key
  final serviceAccountKey = await rootBundle.loadString('assets/your-service-account.json');
  final credentials = ServiceAccountCredentials.fromJson(json.decode(serviceAccountKey));

  final scopes = ['https://www.googleapis.com/auth/cloud-platform'];

  // Get an authenticated HTTP client
  final client = await clientViaServiceAccount(credentials, scopes);

  final accessToken = (await client.credentials).accessToken.data;

  print("AccessToken: $accessToken");

  final Map<String, dynamic> notification = {
    'title': 'Breaking News',
    'body': 'News content here',
  };

  final Map<String, dynamic> message = {
    'topic': '<your_topic>',
    'notification': notification,
  };

  final String url = 'https://fcm.googleapis.com/v1/projects/<your_project_id>/messages:send';

  final response = await http.post(
    Uri.parse(url),
    headers: <String, String>{
      'Content-Type': 'application/json',
      'Authorization': 'Bearer $accessToken',
    },
    body: jsonEncode(<String, dynamic>{
      'message': message,
    }),
  );

  if (response.statusCode == 200) {
    print('Notification sent successfully');
  } else {
    print('Failed to send notification: ${response.statusCode}');
    print('Response: ${response.body}');
  }

  client.close();
}
Step 4: Trigger the Notification
- Invoke the Function:
- You can call the
sendTopicNotificationv2function from your Flutter app wherever you need to trigger a notification:
ElevatedButton(
  onPressed: () {
    sendTopicNotificationv2();
  },
  child: Text('Send Notification'),
)
Conclusion
With the deprecation of the legacy Cloud Messaging API, transitioning to FCM V1 is essential for continued support and access to new features. By following these steps, you can send notifications directly from the client side using a service account JSON. This method enhances the flexibility and security of your app, allowing for better integration with Firebase’s robust ecosystem. Happy coding!
Firebase , Firebasecloudmessaging , Fcm Push Notification , Flutter Developer , Flutter App Development , FCM , Buy flutter template
1. General Firebase and Cloud Messaging Keywords:
- Firebase Cloud Messaging Setup
- Firebase Cloud Messaging tutorial
- FCM push notifications
- Firebase messaging integration
- Firebase push notification service
- FCM V1 update
- FCM client-side integration
- Firebase notifications guide
- Firebase messaging API tutorial
2. Flutter-Specific Keywords:
- Flutter push notifications
- Flutter FCM setup
- Firebase Flutter integration
- Flutter notification tutorial
- Flutter push notification example
3. Authentication and Security Keywords:
- Service account authentication
- Google service account key
- OAuth 2.0 Firebase
- Access token generation
- Secure Firebase integration
4. API-Related Keywords:
- REST API for Firebase messaging
- Firebase API V1 usage
- Firebase messaging API tutorial
- Cloud API for notifications
- Send FCM notifications using API
5. Migration & Updates Keywords:
- Migrating to FCM V1
- FCM legacy deprecation
- Firebase Cloud Messaging API migration
6. Advanced Concepts & Features:
- FCM topic notifications
- FCM notification payload
- FCM push notification security
- Custom notifications Firebase
- Firebase notification topics

